

Adding the Cloudflare service to your WordPress site adds security and performance options for very little effort. A Content Distribution Network (CDN) and Distributed Denial of Service (DDoS) protection become available to you for as little as the effort it takes you to configure it (ie: $0). A Web Application Firewall (WAF) can be added for a starting price of $20/month.
So just what is this we're talking about?
- A Web Application Firewall (WAF) is useful to automatically stop attacks and prevent access to vulnerabilities. The WAF can also be configured manually to create custom solutions to enhance the security of your site.
- A Content Delivery Network (CDN) accelerates access to content within your site by storing data to be served to your customers browsers within Cloudflare's global network, rather than every single request being served directly by your website provider. WordPress hosting services, especially "shared" hosting services, frequently exhibit poor performance (ie: slow page load times) which can in many cases be completely eliminated just by blocking traffic that has no economic value to you (eg: hacking tools), and by accelerating the site's content via a CDN. The CDN also enables high value and low effort features for image optimization and mobile content optimization.
- Distributed Denial of Service (DDoS) protection can prevent your site being held hostage by an attacker who floods your site with traffic to prevent legitimate customers from reaching your site.
Ok, and now why would I want this?
A common response to the need for a WAF amid topics we will cover like rate limiting is: "But I'm not a target."
The unfortunate reality is that everyone is a potential target. Vast armies of automated systems scour the web looking for easy victims. When an automated breakin is successful, a human is notified.
The human then determines your value to them. If you appear to have significant financial means, your site could be held for ransom. If the CPU and network available to your $0-50/month WordPress account is of higher value to the attacker, the site will be conscripted into the attacker's army to run tasks within the framework of their nefarious empire (ie: finding additional vulnerable systems, and launching attacks against new victims). If your site is of unusually high value (eg: you are a financial services provider of some sort), the attacker could simply exploit your available services for their own benefit.
Adding the Cloudflare service to your site offers excellent peace of mind in addition to the performance benefits.
Initial Preparation Work
By following these instructions, Cloudflare will be become your DNS provider. Your DNS registrar will remain the same, but the registrar will be pointed to new nameservers.
Nameserver entries are very commonly configured in DNS with a TTL (Time To Live) value equalling 86400s (ie: 1 week) or longer. Under normal circumstances, this is a perfectly reasonable value. Unfortunately, what it means is that it may take up to that maximum configured period of time before any changes you make to your nameserver infrastructure are realized by the rest of the internet.
As there are as many different ways to make this configuration change as there are DNS providers on the internet, how to apply this change in your environment is out of the scope of this document.
It is especially important to note that you should wait for the current TTL to expire before you begin implementing these changes. For example, if the TTL on your NS records is currently 172800, you should wait for two weeks after adjusting the TTL down before you begin making changes. Again, this is for the sake of consistency and ease of troubleshooting. And, again, it is important to note that this change should be reverted after the rest of the configuration changes have been completed.

As there are as many different ways to make this configuration change as there are DNS providers on the internet, how to apply this change in your environment is out of the scope of this document.
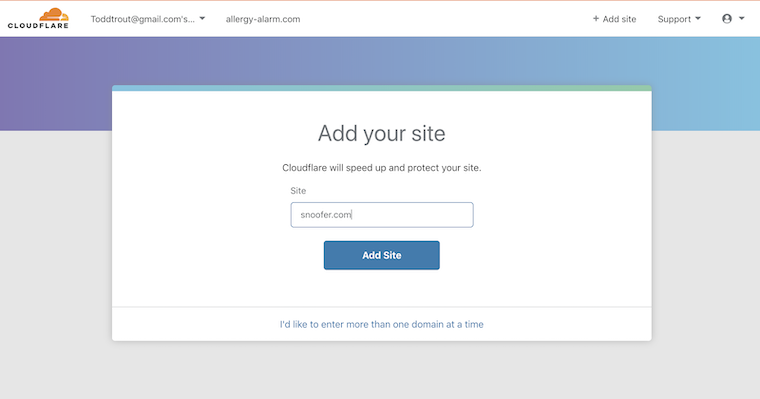
Add your site in Cloudflare
1. Visit www.cloudflare.com, click the Sign Up link at the upper right corner of the screen, enter your details, and you will immediately be dropped to the 'Add your site' dialog. (Note: you should verify your email address when you get a moment!)
2. Cloudflare makes a best effort to clone your DNS records to Cloudflare.
Cloudflare queries your existing nameservers to duplicate the most commonly used DNS records, including A records like www and wiki (among others), and any MX and TXT records (eg: for verification of domain ownership for google or other 3rd party providers).
This process should be sufficient for maybe 90% of sites on the internet. (And, chances are good that you KNOW you have "uncommon" DNS records, if you have them!) That said, you should do a comparison of all DNS entries to be sure that nothing was missed in the duplication. If anything was missed, you should add them manually.
3. The next screen will ask you to select a plan. The free plan includes only CDN and DDoS protection. To get much more benefit, the $20 plan that includes the Web Application Firewall is an incredible value.

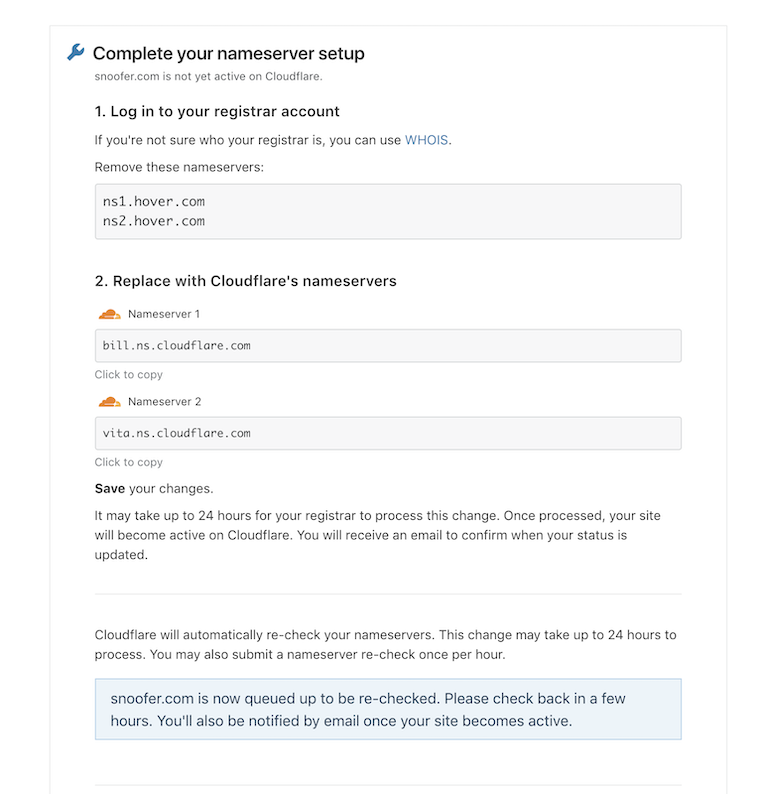
4. You should now be at this screen while you go change your nameservers with your registrar (how to do that is outside the scope of this document, but many guides are available online if you need one.)

5. If you reload this page you will probably get a success message in 5-10 minutes, you should only become concerned something is wrong after three hours.
Configuring your site for use
The free service is valuable but most people are going to want more. As your needs grow, so can the bill. If your site is being very aggressively targeted for abuse, you can create rate limit rules that slow down or stop the abuser, and as those rules trigger they can cost you money. If you want a premium network routing solution that improves page load speeds, you can turn on the Argo service for additional cost.
All of this is very optional and the $20 is going to take you very far.
One thing I hear a lot - "So is there a catch where this is going to cost more than $20?" The answer is: probably not, unless you have a very extreme case. I took on a friend's WordPress site as a weekend hobby for kicks because it was a worst case challenge. The site delivers 1.5 terabytes of content per month to 750,000 unique users. It was also under significant attacks and probes for vulnerabilities. The Cloudflare bill is still $20.
While we wait for your DNS changes to propagate, let's tune up Cloudflare and describe some examples of how to use it! For almost everything inside the Cloudflare interface there is no save button, everything takes effect when a change is made. Changes do not affect your site immediately, and can take a few minutes.
Under the Crypto tab:
- Onion Routing - Turn it off. This accelerates your content for anonymous internet traffic. It's very unlikely you have an interest in this traffic on an ecommerce site.
- Always Use HTTPS: On.
- Automatic HTTPS Rewrites: On. You do want http changed to https.
- Optionally: HSTS: On. Investigate if your domain is safe to turn on HSTS. The chances you will break something are very slim. This is a very powerful feature that totally prevents a user's browser from ever thinking they can use http. It protects the users from protocol downgrade attacks; I will cover this in an article exclusively on this topic.
Under the Firewall tab, we can add a useful customization specific to your access to the administrative functions of the site:
Zone Lockdown: Enabled. There's just no need to have /wp-admin getting hammered away at 24/7 by robots hoping to get lucky and break into your site.
In the below image, I have enabled zone lockdown without adding any allowed IP addresses.
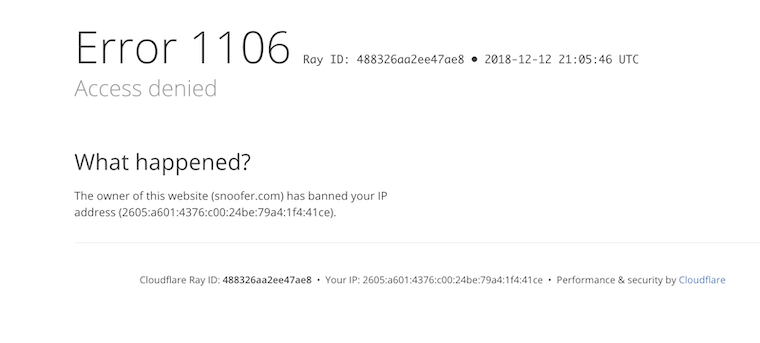
Trying to go to snoofer.com/wp-admin is now blocked and I need to add the IPV6 address 2605:a601:4376:c00:24be:79a4:1f4:41ce to the IP range above to be allowed access.
In the below image, I have enabled zone lockdown without adding any allowed IP addresses.
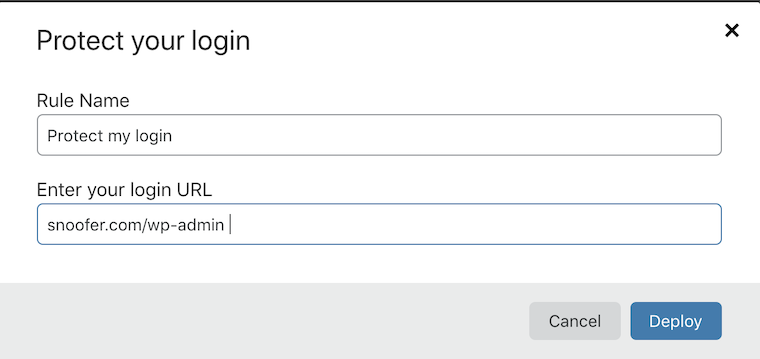
Enable Rate Limiting then select "Protect your login". This will limit automated brute force attempts to break into the admin portion of your site.
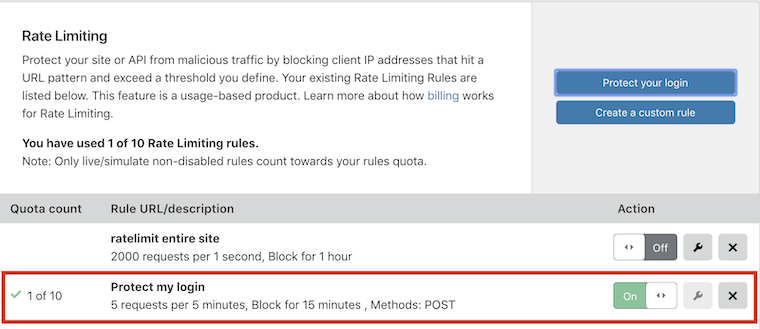
Clicking on the wrench icon to the right on the on/off switch will take you to this screen to configure the login admin path, which should be yourdomain.com/wp-admin for all except unusually customized WordPress installations.
Let's go to the Web Application Firewall now.

Under the Firewall tab and half way down the page, switch this to on.
Now let's look at the OWASP (Best Practices from the Open Web Application Security foundation) rule set.
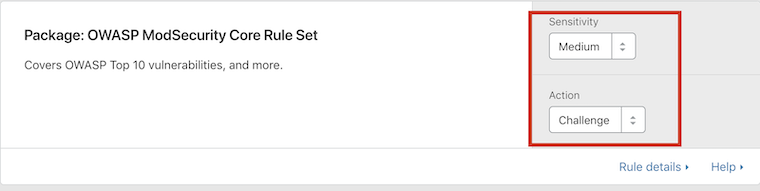
Under the Firewall tab and half way down the page, switch this to on.
Off is the default and this is not a good starting point.
Next Cloudflare Rule Set - This is where your $20 is going to go very far to protect your site.
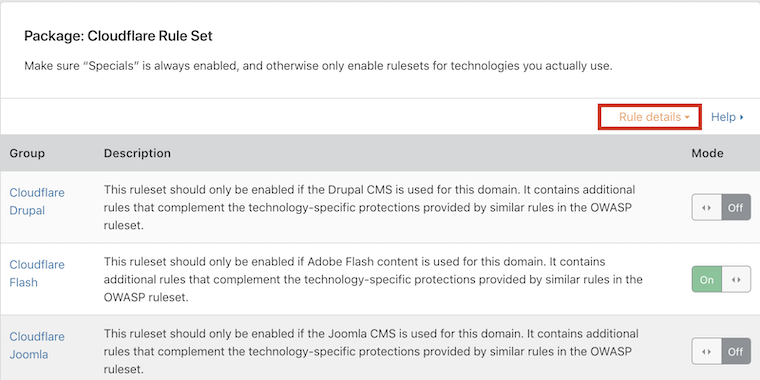
Many rule sets are enabled by default. Enable these per the technologies your site uses -- eg: if you use Flash in your site, turn it on.
WordPress is enabled by default. Cloudflare updates this list with rules that block known vulnerabilities specific to WordPress.
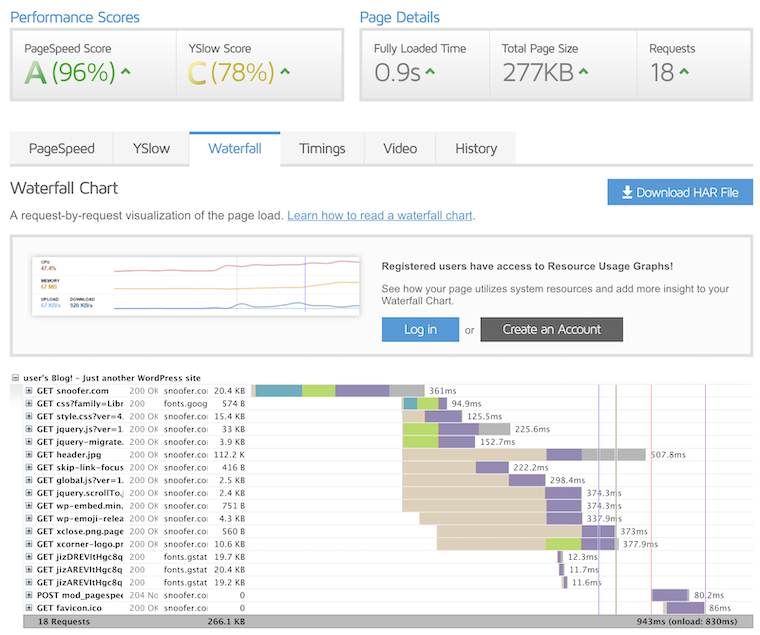
Now let's do a very quick look at website load time performance test before and after enabling Cloudflare which by default includes CDN acceleration.
GTMetrix Speedtest Before:
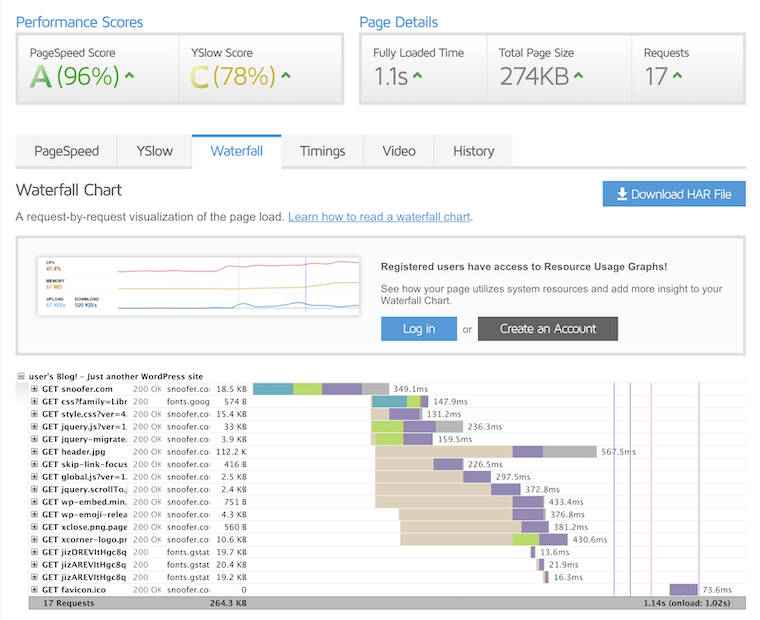
There is very little content in the default WordPress page being served here, so the gains are not tremendous. It took 1.1 seconds before and .9 seconds after. A more complex website will have more dramatic results.
And after:
In the previously mentioned worst case website project, page load times were an unacceptable 15 seconds due to inefficiency in the site combined with the hosting service being overloaded by the popularity of the site. Cloudflare along with no configuration changes reduced this to 5 seconds. More detailed configuration of the CDN options reduced this to 1.7 seconds.
A disaster that would've taken a consultant weeks and an unknown amount of money to fix was corrected in 30 minutes, for $20/month. This experience really opened my eyes that there was a tremendous amount of frustration and expense that more people could be averting.
About Qualpay
Qualpay is a leading provider of integrated, omnichannel payment solutions. The company's cloud-based payments platform enables businesses to modernize strategically through the use of reporting intelligence to streamline the payment process. Qualpay addresses and resolves the payment challenges businesses face and ensures a stronger, more robust infrastructure for a business, developer, and partner. Simply, Qualpay enables a better way to manage payments. For more information on how Qualpay is reinventing a new era of payment processing, visit www.qualpay.com.


